SENVEND Telemetry
Getting Started in my.senvend
Seven steps set up your telemetry: from your company data through products and location to a stocked machine. Stick to the order — each step builds on the previous one.
Once per company
You set up company data, products, and product categories only once — they apply to all your machines.
Once per machine
You set up location, machine, product planning, and stock separately for each machine.
After that, it runs itself
Once everything's set up, the machine reports sales, stock levels, and faults on its own.
Age verification: only without a cash system on the machineRight now, age verification can only be controlled via my.senvend if the machine has no cash system built in — so purely cashless machines and machines with SENVEND Storefront. On every other machine, the age restriction has to be set on the machine itself, until a solution for that exists. So the category in my.senvend doesn't replace that setting on the machine.
What you need firstAccess to my.senvend and a built-in, activated SENVEND payment terminal. You get both through onboarding.
Step 1
Fill in company data
You enter your company data once. It determines what your addresses in my.senvend look like, what appears on your public page, and how your sales are recorded for tax purposes.
Open company
In my.senvend, go to Verwaltung (management) and then Unternehmen (company) on the left.
Name and tax number
Set the URL slug
The URL slug names your company in every address — your homepage, for example, would then be at my.senvend.com/dein-kuerzel/uebersicht.
Decide on a public page
You can turn your public company page on or off. It's independent of your locations' public pages — you switch those on separately there.
Logo, description, and social media
Preview and save
Use Vorschau (preview) to see what your public page looks like. Speichern (save) applies your changes.
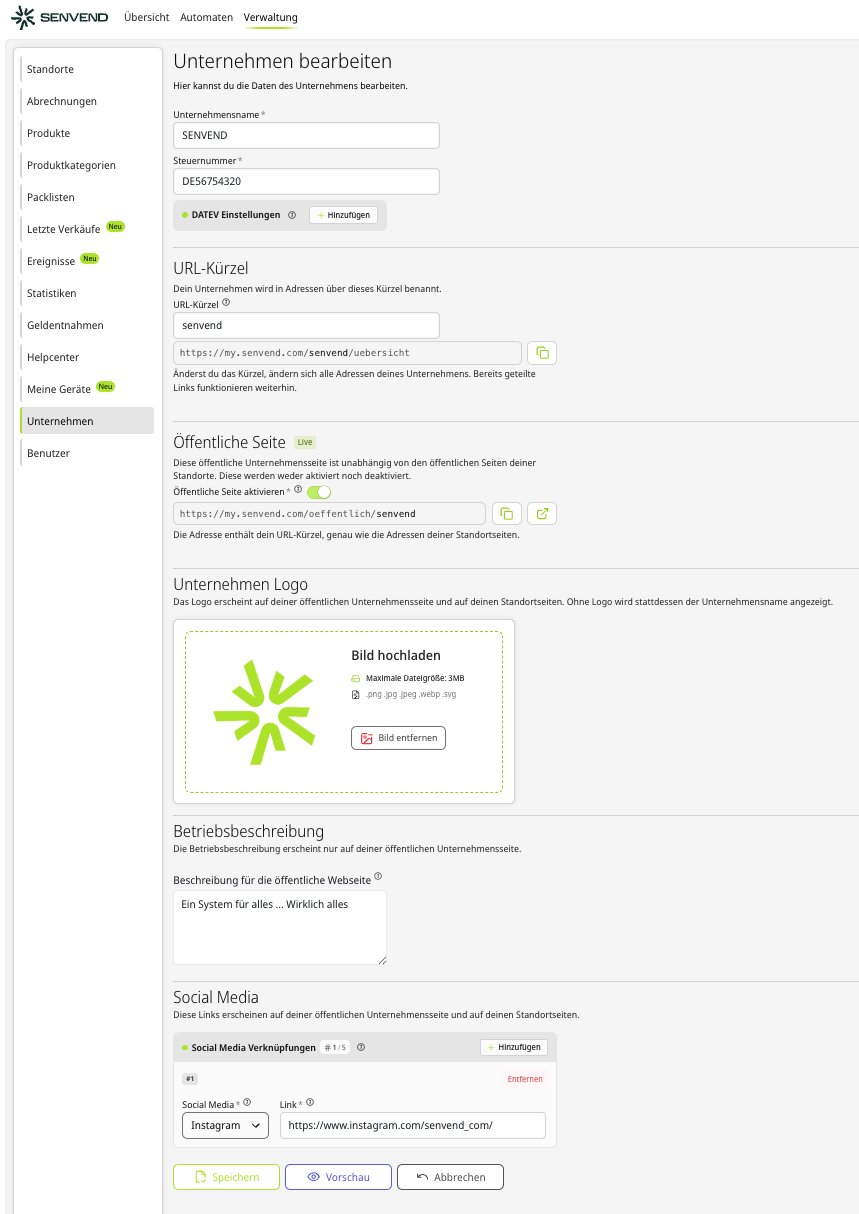
Changing the slug changes every addressIf you change the URL slug later, every address for your company changes too. Links you've already shared, though, keep working.
Step 2
Create products
Create every item you sell in your machines. The product list applies to your whole company — so you create each item just once and can then plan it into as many machines as you like.
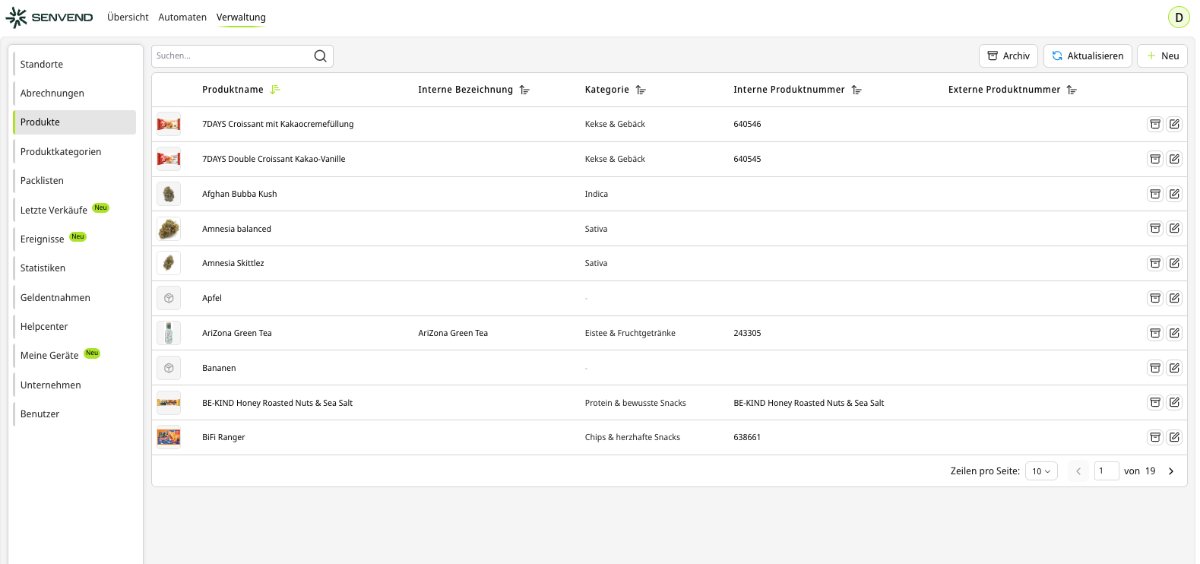
Open the product list
Go to Verwaltung (management) and then Produkte (products) on the left. Create a product with Neu (new) at the top right.
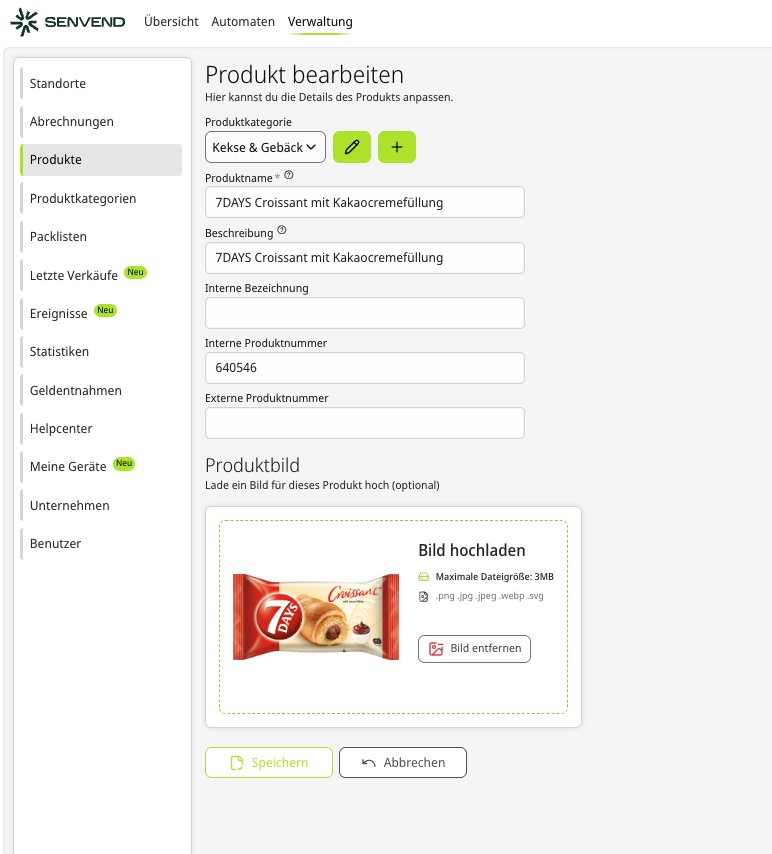
Fill in the product
Only the product name is required. Everything else helps you sort and analyze:
Upload a product image
Optionally, upload a product image — maximum 3 MB as PNG, JPG, JPEG, WEBP, or SVG. You'll see the image again later in the pick list, in stock, and on the Storefront display.
Step 3
Create product categories
Categories organize your products — and they handle two things you'd otherwise have to set individually on every machine: age verification and the layout on the Storefront display.
Open categories
Go to Verwaltung (management) and then Produktkategorien (product categories) on the left. Create a category with Neu (new).
Set age verification
For every category, you decide whether age verification is needed — for example Mindestalter 16 (minimum age 16) or Keine Altersprüfung (no age check). Every product in that category automatically takes on the setting.
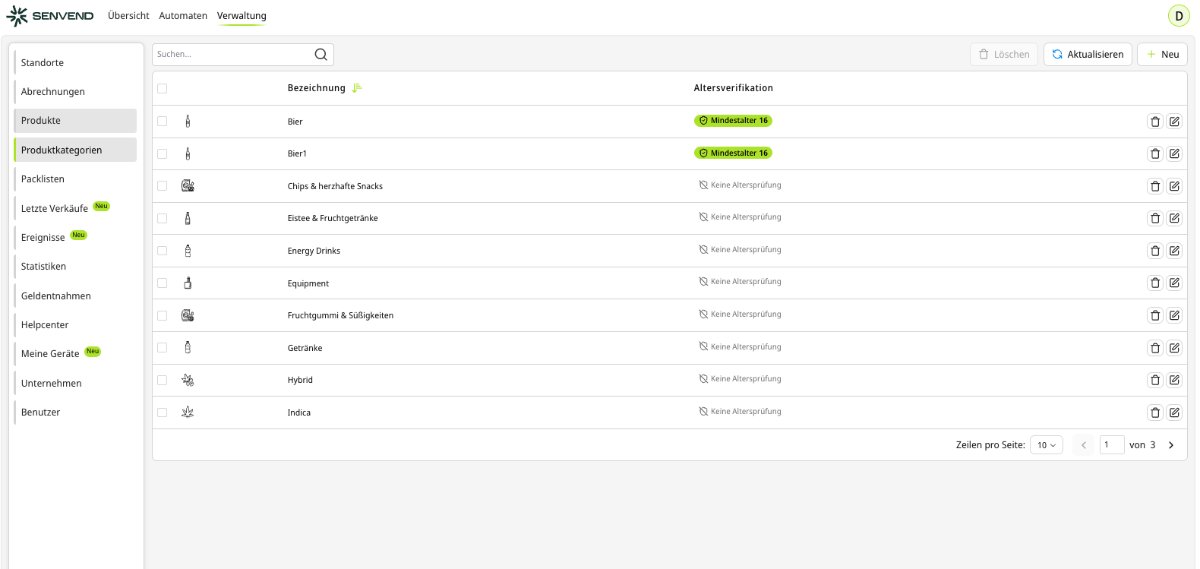
Age verification: only without a cash system on the machineRight now, age verification can only be controlled via my.senvend if the machine has no cash system built in — so purely cashless machines and machines with SENVEND Storefront. On every other machine, the age restriction has to be set on the machine itself, until a solution for that exists. So the category in my.senvend doesn't replace that setting on the machine.
Categories are also the Storefront categoriesThe categories you create here are also the categories your customers browse through on the Storefront display. So it's worth naming them the way you want customers to read them.
Provider per categoryWhich age-verification method is used is also set in the product category — not on the individual machine.
Step 4
Create a location
A location is the place where your machines stand. Every machine needs exactly one location — so you create it before you create the machine.
Open locations
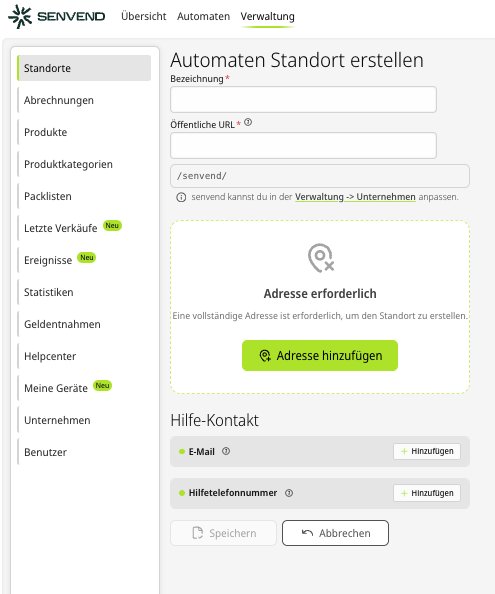
Go to Verwaltung (management) and then Standorte (locations) on the left. Create a location with Neu (new).
Name and address
Add a help contact
Add an email address and a help phone number for this location. Both are optional — but they unlock the Helpcenter on the machine.
Set up the public page
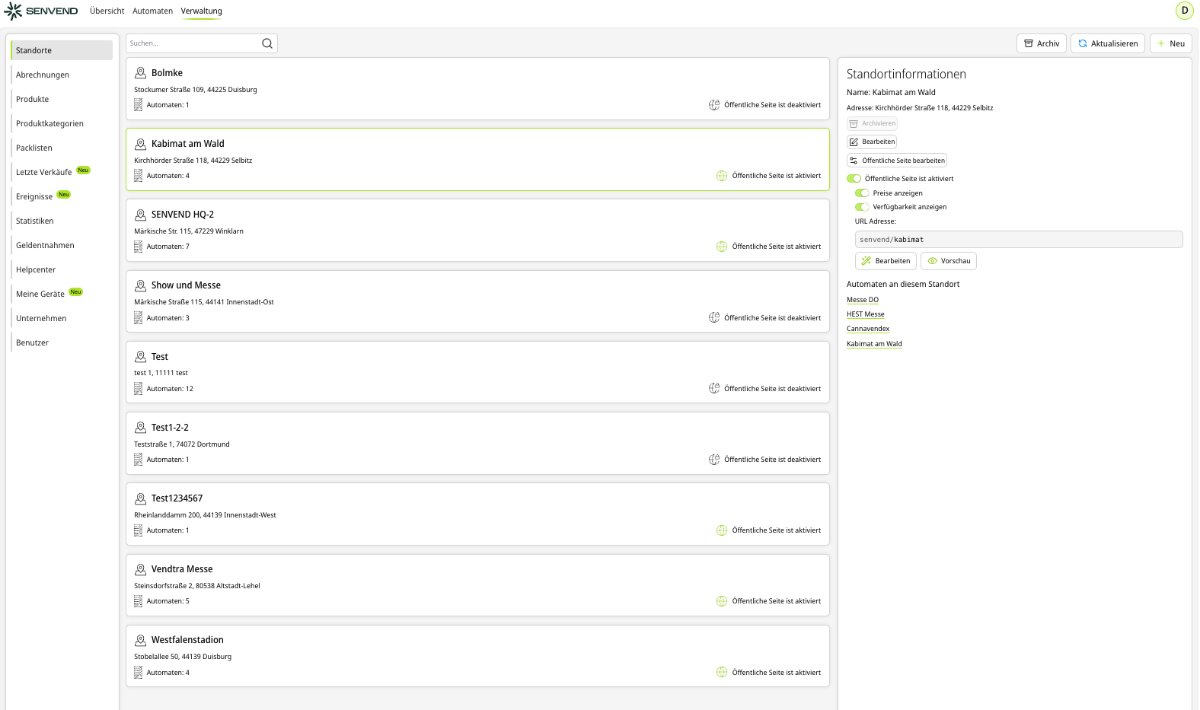
In the location list, you'll see the Standortinformationen (location information) on the right. There you switch the public page on or off and decide whether prices and availability are shown on it. Use Vorschau (preview) to see the result.
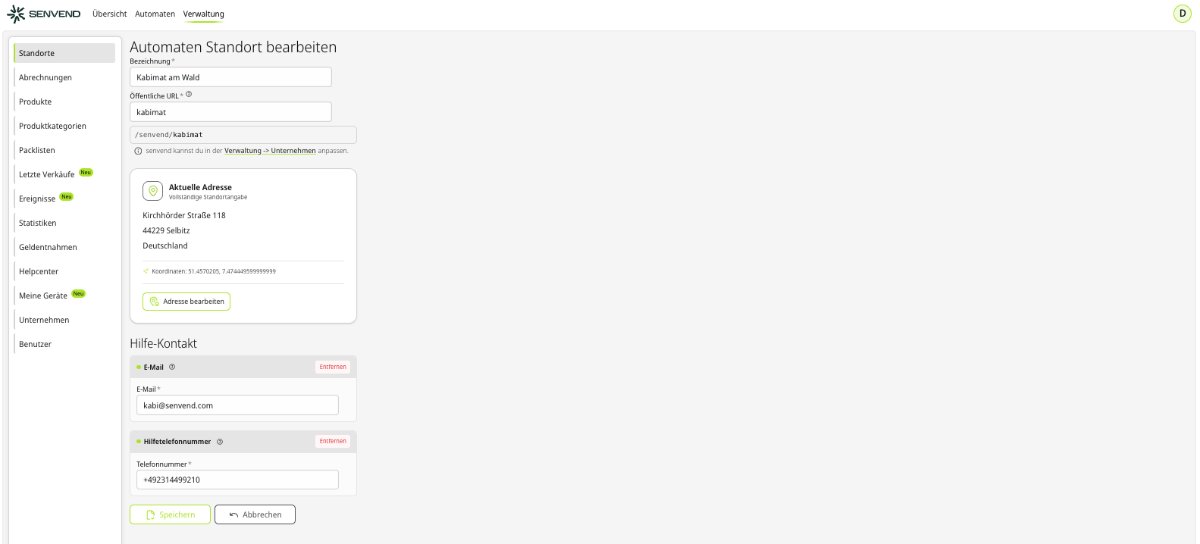
The help contact unlocks the Helpcenter on the machineIf a help contact is set, the terminal can show a help button — or your customers tap the screensaver and land in the Helpcenter. From there they send you an error report, which you see in my.senvend under Ereignisse (events).
The slug comes from your company dataThe first part of the location address is your company's URL slug from step 1. You can change it under Verwaltung (management) > Unternehmen (company).
Step 5
Create a machine
Now you connect everything: the machine gets a name, the SENVEND payment terminal is assigned, and the location is selected.
Create a machine
Go to Automaten (machines) at the top and click Neu (new) on the right. You'll then find the machine in the list and open Einstellungen (settings) on the left.
Fill in the basic data
Set languages
Under Sprachen (languages), you decide which languages are available on the machine. The top enabled language is the default language — drag it to the first position using the handle on the right. German, English, French, Italian, and Dutch are available.
Add image
Optionally, upload a photo of the machine on the right under Automat Bild (machine image) (maximum 3 MB). This helps if you run several similar machines.
Save
The machine is created with Speichern (save).
Only for SENVEND StorefrontThe fields Storefront and Verhalten bei fehlgeschlagener Ausgabe (behavior on failed vend) belong to SENVEND Storefront. You don't need them for a normal machine — the instructions for that are in the Storefront help.
Step 6
Product planning for the machine
In product planning, you set which product goes in which slot and what it costs. Only after that can the machine sell.
Open product planning
Open the machine and go to Produktplanung (product planning) on the left. Plan in a product with Neu (new).
Set product and price
Add a selection
Below, use Auswahl (selection) and Hinzufügen (add) to set which slot the product goes in. A product can be in multiple slots — up to 100 selections per product. Each selection includes:
Save and repeat
Save — then repeat for every other slot.
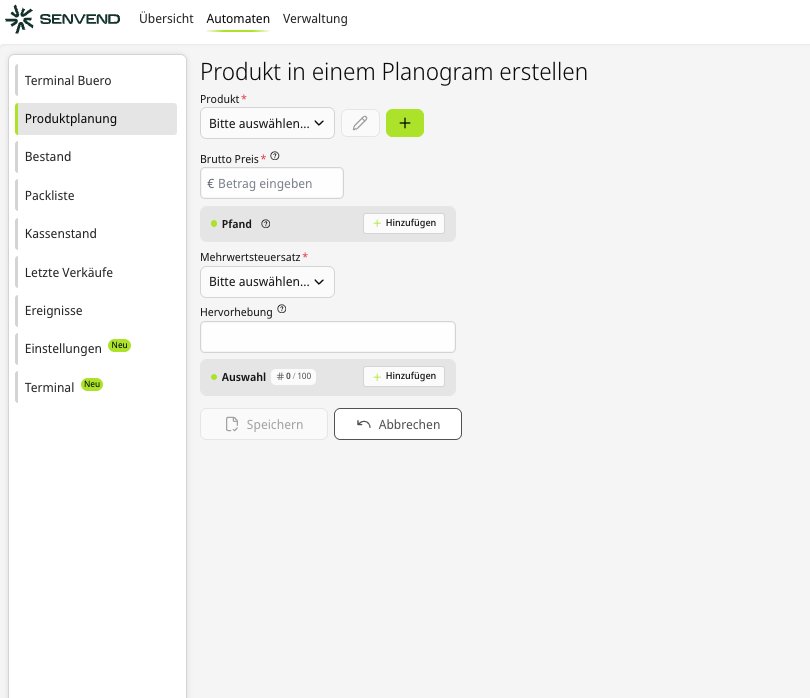
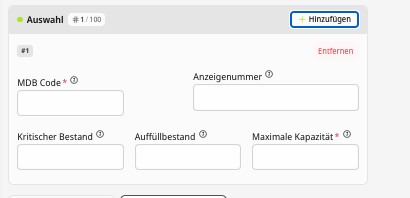
The MDB code has to match the machineThe MDB code in my.senvend must be exactly the number the machine reports for this slot. If it doesn't match, the sale gets attributed to the wrong product — and the stock count no longer adds up.
Step 7
Enter stock
Finally, tell the telemetry how much is actually in the machine. From then on, the fill level, low-stock warnings, and pick lists are accurate.
Open stock
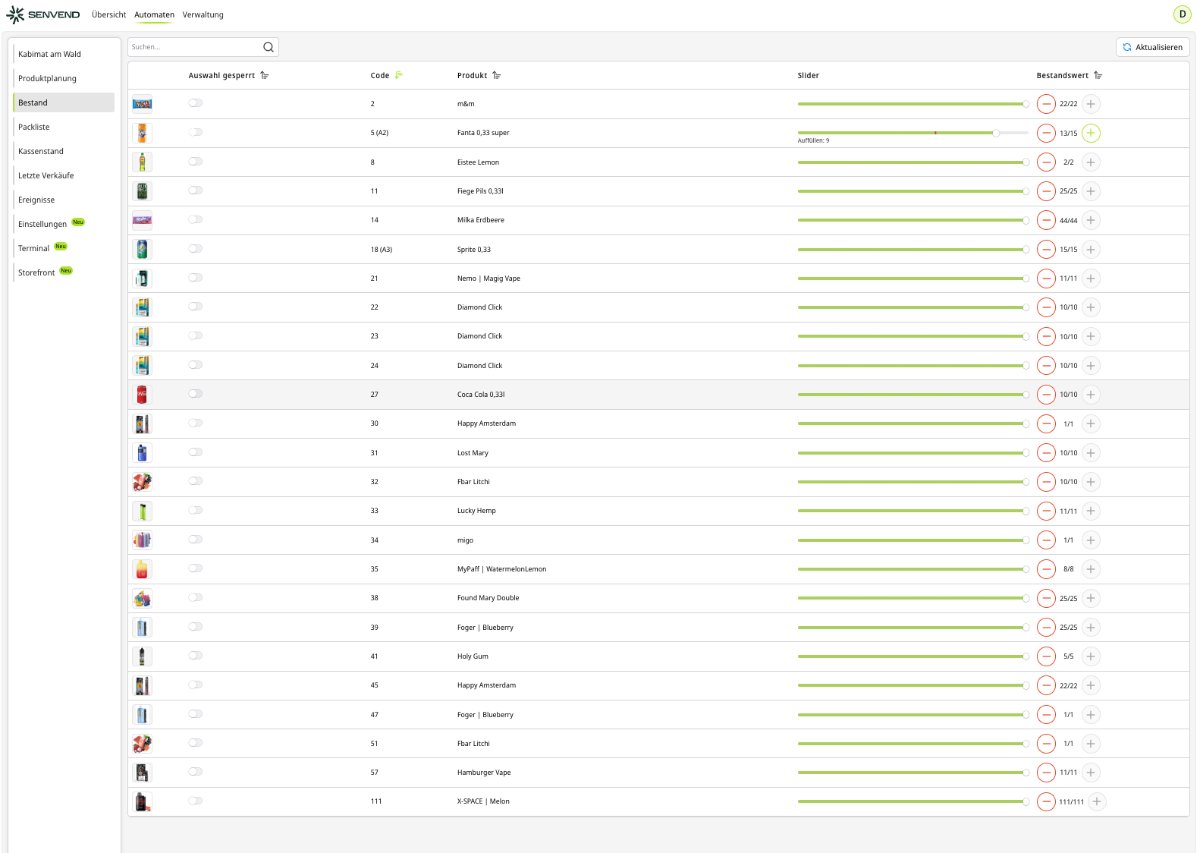
Open the machine and go to Bestand (stock) on the left. For every selection, you see:
Adjust stock
Use the slider or the plus and minus buttons to change the stock. Below the slider, my.senvend shows you how many units you need to restock.
Faster with press and hold
The buttons also respond to a long press: holding minus sets the slot to 0, holding plus fills it to maximum capacity.
Or fill it via the pick list
For your on-site route, the pick list is the more convenient way: go to Packliste (pick list) and click Packen starten (start packing). Then use Befüllen (fill) to enter the pack quantity for every item and finish with Fertig (done) — the stock is updated.
No stock management, no stockStock and pick lists only work if Bestandsverwaltung (stock management) is active under the machine's settings.
Optional
Invite users and assign roles
If several people work with the telemetry, you create a separate account for each one — with exactly the permissions they need.
Have them register first
The new person has to register themselves at my.senvend.com beforehand — with exactly the email address you're about to enter. Without this registration, the account can't be granted.
Create the account
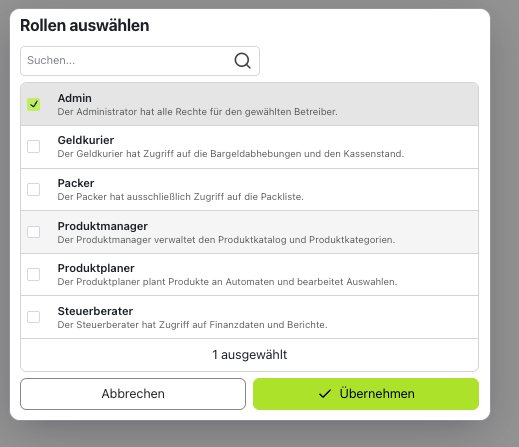
Go to Verwaltung (management) and then Benutzer (users) on the left. Neu (new) opens "Betreiberzugriff erstellen (create operator access)", where you enter the email address and choose one or more roles.
Choose a role
Everything set up?
Then check out what you can do with the telemetry day to day — from pick lists to remote credit to billing.

 +49 231 4499210
SENVEND Telemetry
Getting Started in my.senvend
Seven steps set up your telemetry: from your company data through products and location to a stocked machine. Stick to the order — each step builds on the previous one.
Once per company
You set up company data, products, and product categories only once — they apply to all your machines.
Once per machine
You set up location, machine, product planning, and stock separately for each machine.
After that, it runs itself
Once everything's set up, the machine reports sales, stock levels, and faults on its own.
Age verification: only without a cash system on the machineRight now, age verification can only be controlled via my.senvend if the machine has no cash system built in — so purely cashless machines and machines with SENVEND Storefront. On every other machine, the age restriction has to be set on the machine itself, until a solution for that exists. So the category in my.senvend doesn't replace that setting on the machine.
What you need firstAccess to my.senvend and a built-in, activated SENVEND payment terminal. You get both through onboarding.
Step 1
Fill in company data
You enter your company data once. It determines what your addresses in my.senvend look like, what appears on your public page, and how your sales are recorded for tax purposes.
Open company
In my.senvend, go to Verwaltung (management) and then Unternehmen (company) on the left.
Name and tax number
Set the URL slug
The URL slug names your company in every address — your homepage, for example, would then be at my.senvend.com/dein-kuerzel/uebersicht.
Decide on a public page
You can turn your public company page on or off. It's independent of your locations' public pages — you switch those on separately there.
Logo, description, and social media
Preview and save
Use Vorschau (preview) to see what your public page looks like. Speichern (save) applies your changes.
Changing the slug changes every addressIf you change the URL slug later, every address for your company changes too. Links you've already shared, though, keep working.
Step 2
Create products
Create every item you sell in your machines. The product list applies to your whole company — so you create each item just once and can then plan it into as many machines as you like.
Open the product list
Go to Verwaltung (management) and then Produkte (products) on the left. Create a product with Neu (new) at the top right.
Fill in the product
Only the product name is required. Everything else helps you sort and analyze:
Upload a product image
Optionally, upload a product image — maximum 3 MB as PNG, JPG, JPEG, WEBP, or SVG. You'll see the image again later in the pick list, in stock, and on the Storefront display.
Step 3
Create product categories
Categories organize your products — and they handle two things you'd otherwise have to set individually on every machine: age verification and the layout on the Storefront display.
Open categories
Go to Verwaltung (management) and then Produktkategorien (product categories) on the left. Create a category with Neu (new).
Set age verification
For every category, you decide whether age verification is needed — for example Mindestalter 16 (minimum age 16) or Keine Altersprüfung (no age check). Every product in that category automatically takes on the setting.
Age verification: only without a cash system on the machineRight now, age verification can only be controlled via my.senvend if the machine has no cash system built in — so purely cashless machines and machines with SENVEND Storefront. On every other machine, the age restriction has to be set on the machine itself, until a solution for that exists. So the category in my.senvend doesn't replace that setting on the machine.
Categories are also the Storefront categoriesThe categories you create here are also the categories your customers browse through on the Storefront display. So it's worth naming them the way you want customers to read them.
Provider per categoryWhich age-verification method is used is also set in the product category — not on the individual machine.
Step 4
Create a location
A location is the place where your machines stand. Every machine needs exactly one location — so you create it before you create the machine.
Open locations
Go to Verwaltung (management) and then Standorte (locations) on the left. Create a location with Neu (new).
Name and address
Add a help contact
Add an email address and a help phone number for this location. Both are optional — but they unlock the Helpcenter on the machine.
Set up the public page
In the location list, you'll see the Standortinformationen (location information) on the right. There you switch the public page on or off and decide whether prices and availability are shown on it. Use Vorschau (preview) to see the result.
The help contact unlocks the Helpcenter on the machineIf a help contact is set, the terminal can show a help button — or your customers tap the screensaver and land in the Helpcenter. From there they send you an error report, which you see in my.senvend under Ereignisse (events).
The slug comes from your company dataThe first part of the location address is your company's URL slug from step 1. You can change it under Verwaltung (management) > Unternehmen (company).
Step 5
Create a machine
Now you connect everything: the machine gets a name, the SENVEND payment terminal is assigned, and the location is selected.
Create a machine
Go to Automaten (machines) at the top and click Neu (new) on the right. You'll then find the machine in the list and open Einstellungen (settings) on the left.
Fill in the basic data
Set languages
Under Sprachen (languages), you decide which languages are available on the machine. The top enabled language is the default language — drag it to the first position using the handle on the right. German, English, French, Italian, and Dutch are available.
Add image
Optionally, upload a photo of the machine on the right under Automat Bild (machine image) (maximum 3 MB). This helps if you run several similar machines.
Save
The machine is created with Speichern (save).
Only for SENVEND StorefrontThe fields Storefront and Verhalten bei fehlgeschlagener Ausgabe (behavior on failed vend) belong to SENVEND Storefront. You don't need them for a normal machine — the instructions for that are in the Storefront help.
Step 6
Product planning for the machine
In product planning, you set which product goes in which slot and what it costs. Only after that can the machine sell.
Open product planning
Open the machine and go to Produktplanung (product planning) on the left. Plan in a product with Neu (new).
Set product and price
Add a selection
Below, use Auswahl (selection) and Hinzufügen (add) to set which slot the product goes in. A product can be in multiple slots — up to 100 selections per product. Each selection includes:
Save and repeat
Save — then repeat for every other slot.
The MDB code has to match the machineThe MDB code in my.senvend must be exactly the number the machine reports for this slot. If it doesn't match, the sale gets attributed to the wrong product — and the stock count no longer adds up.
Step 7
Enter stock
Finally, tell the telemetry how much is actually in the machine. From then on, the fill level, low-stock warnings, and pick lists are accurate.
Open stock
Open the machine and go to Bestand (stock) on the left. For every selection, you see:
Adjust stock
Use the slider or the plus and minus buttons to change the stock. Below the slider, my.senvend shows you how many units you need to restock.
Faster with press and hold
The buttons also respond to a long press: holding minus sets the slot to 0, holding plus fills it to maximum capacity.
Or fill it via the pick list
For your on-site route, the pick list is the more convenient way: go to Packliste (pick list) and click Packen starten (start packing). Then use Befüllen (fill) to enter the pack quantity for every item and finish with Fertig (done) — the stock is updated.
No stock management, no stockStock and pick lists only work if Bestandsverwaltung (stock management) is active under the machine's settings.
Optional
Invite users and assign roles
If several people work with the telemetry, you create a separate account for each one — with exactly the permissions they need.
Have them register first
The new person has to register themselves at my.senvend.com beforehand — with exactly the email address you're about to enter. Without this registration, the account can't be granted.
Create the account
Go to Verwaltung (management) and then Benutzer (users) on the left. Neu (new) opens "Betreiberzugriff erstellen (create operator access)", where you enter the email address and choose one or more roles.
Choose a role
Everything set up?
Then check out what you can do with the telemetry day to day — from pick lists to remote credit to billing.